Basically my drawing style is to copy, using tracing paper, straight from a photograph which will probably attract a few shaking heads and sharp intakes of breath from established aviation artists. Way back in B.C. (Before Computers), I would trace an aeroplane outline from a 6x4in colour print, over a light box, adding as much detail as I could. Using an overhead projector, I would enlarge the image onto draughting paper and then make a neatish pencil drawing using French Curves, rulers, circle templates etc and add much more detail as I could from reference photographs and aircraft scale drawings. Today, I use a digital image on my computer. I open it in Photoshop Elements and click on the ‘Find Edges’ filter and print out a ready made outline of the subject I want to draw. This little facility has cut down a lot of the preliminary drawing time now.
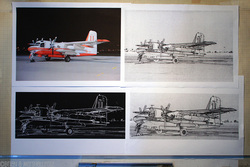
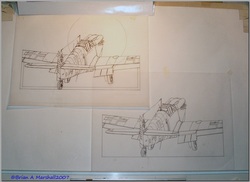
I then do a close crop to enlarge the image to fit on an A4 sheet as that is the largest size I can print out. From that I click the ‘Negative’ tool to reverse the image as I find it easier to follow and trace a white line through tracing paper than a black one and print out one of each on A4 paper. I also copy the photograph and the two line drawings onto the laptop I use by my drawing board so I can zoom in and out of them to check details as I’m drawing. I also refer to scale drawings to check the position of panel lines and other details that don’t show clearly in the photograph.
That is about as far as I go in using a computer as a drawing tool as I’m of the old school and much prefer sitting behind a drawing board than a computer screen and dragging a nib across a piece of paper than waving a mouse about.
That is about as far as I go in using a computer as a drawing tool as I’m of the old school and much prefer sitting behind a drawing board than a computer screen and dragging a nib across a piece of paper than waving a mouse about.
I attach the cropped image, with masking tape, to a backing sheet of A3 cartridge paper on top of which I tape a sheet of 63gsm A4 tracing paper and start tracing the fuselage outlines using a ruler, French curves and assorted templates. At this stage I draw in pencil and I prefer to use a propelling pencil, over wooden pencils, with a 0.5mm HB lead in it as I can maintain a sharper point on the lead by slowly rotating the propelling pencil between my fingers as I draw. With harder leads I use a sanding block. Using an HB lead also makes it easier to erase lines if I make a mistake but being a soft lead as well it also makes a lot of mess and smudges very easily unlike an H lead. At this point I’m not too worried about that.
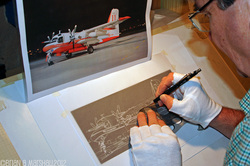
Having copied as much of the ‘Find Edge’ print out as I can and satisfied with the amount of detail I have on the illustration from constantly checking the reference photos and scale drawings, I set about drawing the line work again but this time in ink using a 0.25mm nib. This is a fairly thick nib which I find ideal for doing an initial drawing with. Pencil lines tend to smudge and fade and make a mess. Any mistakes, and there are a few, and I scrape away the ink with a sharp knife blade. When finished, I clean the tracing paper with white spirit on a piece of tissue or in my case a piece of toilet paper. Apart from not wrinkling the tracing paper, the white spirit lifts off the pencil work under the ink work and cleans the drawing area of any graphite smudges.
For some reason the few large wooden picture frames I have are not made to fit the international paper standard of ISO 216 for A-sized sheets of paper, being some what shorter length wise and longer height wise so a bit of dimension juggling is now required. I include a mount, which helps keep the finished art work off the inside of the glass, consisting of two sheets of coloured card with the centre area cut out with a 0.5mm recess. Using a sheet of A3 cartridge paper cut to the width of the wooden frame I lay the A4 drawing roughly in the centre. I then measure around the four sides with a ratio of 1 from the top, 1.5 from the sides and 2 from the bottom (e.g: 10mm/15mm/20mm) to give the final location of the image in the frame. For the majority of frames I have this generally gives me an area for the drawing to fit in of approximately 300mm x 220mm or just slightly larger than A4 size. You can get ‘A’ sized frames but the larger ones tend not to have a wooden surround and held together with clips.

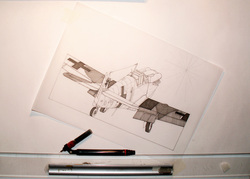
With the rough A4 ink drawing fixed within the frame space, I then secure a sheet of heavier 90gsm A3 tracing paper over the top and set about drawing the line work all again. This time much neater and with thinner nibbed pens. I start with a nib size 0.18mm for the main outlines, which are to be re-drawn again for the finished piece, and a 0.10mm nib for panel lines etc. that will not be re-drawn.
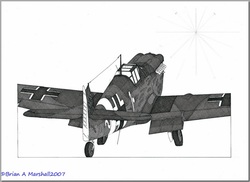
When the ink is dry, I clean the tracing paper with white spirit to lift off any greasy fingerprints or dirt to leave a clean surface to draw on. It also pulls off some of the ink pigment making the black lines, particularly the ones that are not going to be re-drawn, a little bit opaque. The next stage is to add a star to the drawing, lightly in pencil, so I know the angles that I need to draw my lines at. My drawing style is based on cross-hatching and although it’s a technique that’s been around for hundreds of years, this version is probably unique to myself as I haven’t seen any one else producing pictures like this. I draw straight lines using a parallel and motion on a drawing board, less than a hair width apart using a draughting pen with a 0.10mm nib, at different angles to build up a tonal pattern. The more lines I put down, the darker the area. I generally start with the parts of the drawing that are going to be the darkest and these are usually anything black like the wheels or anti-glare panels through to shadows under wings.
When the ink is dry, I clean the tracing paper with white spirit to lift off any greasy fingerprints or dirt to leave a clean surface to draw on. It also pulls off some of the ink pigment making the black lines, particularly the ones that are not going to be re-drawn, a little bit opaque. The next stage is to add a star to the drawing, lightly in pencil, so I know the angles that I need to draw my lines at. My drawing style is based on cross-hatching and although it’s a technique that’s been around for hundreds of years, this version is probably unique to myself as I haven’t seen any one else producing pictures like this. I draw straight lines using a parallel and motion on a drawing board, less than a hair width apart using a draughting pen with a 0.10mm nib, at different angles to build up a tonal pattern. The more lines I put down, the darker the area. I generally start with the parts of the drawing that are going to be the darkest and these are usually anything black like the wheels or anti-glare panels through to shadows under wings.

Once the main line work is completed it needs to be set aside, preferably for a week, for the ink to dry thoroughly. Now the destructive part of the process begins as I rub out the lines I’ve drawn using soft erasers to tone down the black ink and hard erasers to pick out the highlights to achieve a 2D effect. Care has to be taken not to lift of to much ink as it can leave a very flat drawing. Satisfied that the right black and white tonal effect has been achieved, then it’s just a case of re-drawing some of the lines back in around the outline and a few other areas to pick out some of the detail.
I have in the past added colour at this point by using felt tip pens. Colours are of course limited to what is available in the pack and applied to the reverse side of the drawing, freehand, and letting the lines blend into each other while still wet so as no discernible lines are formed. When dry I use erasers to match the highlighting on the pen & ink side of the drawing.
I have in the past added colour at this point by using felt tip pens. Colours are of course limited to what is available in the pack and applied to the reverse side of the drawing, freehand, and letting the lines blend into each other while still wet so as no discernible lines are formed. When dry I use erasers to match the highlighting on the pen & ink side of the drawing.
